Monday, January 23, 2012

Flower power


Well now for what is in the box!
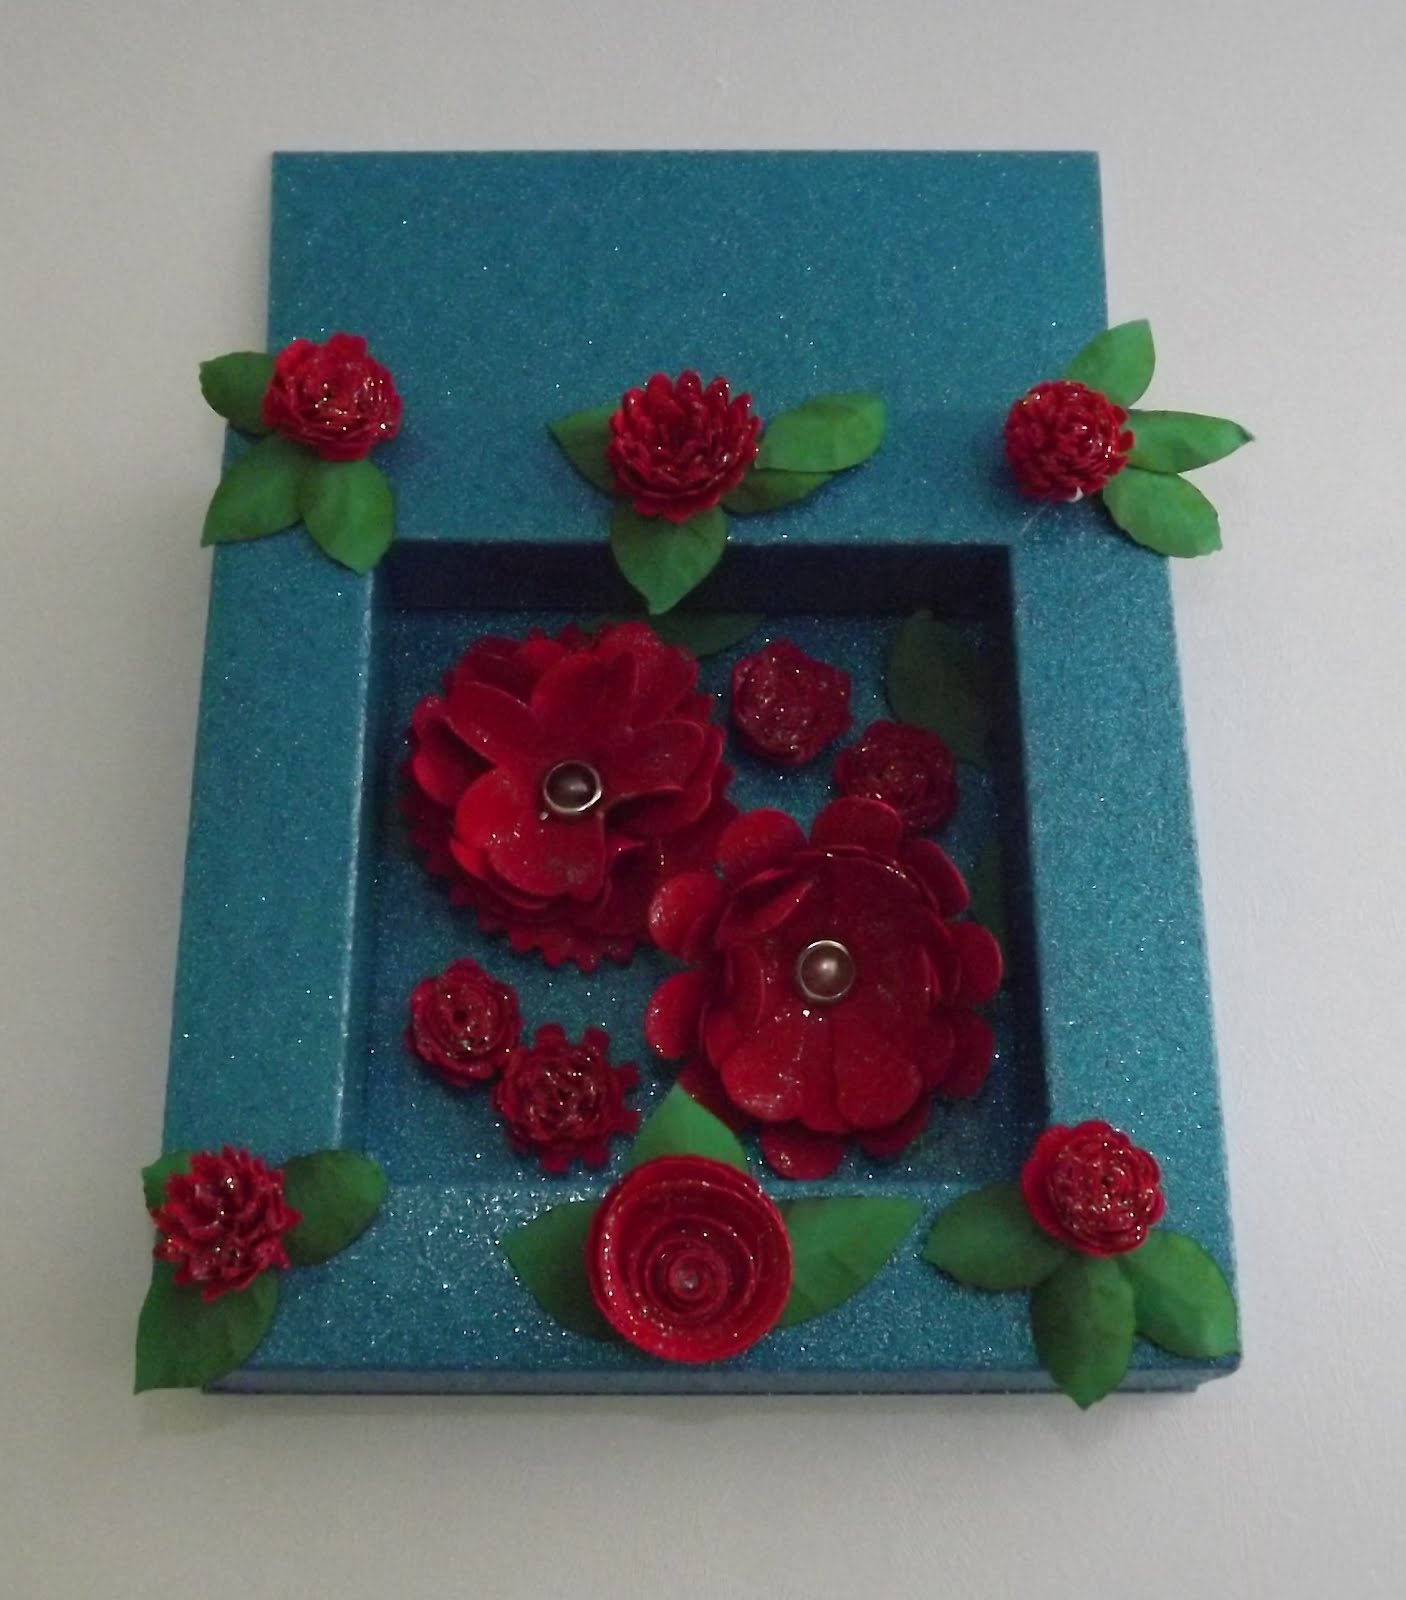
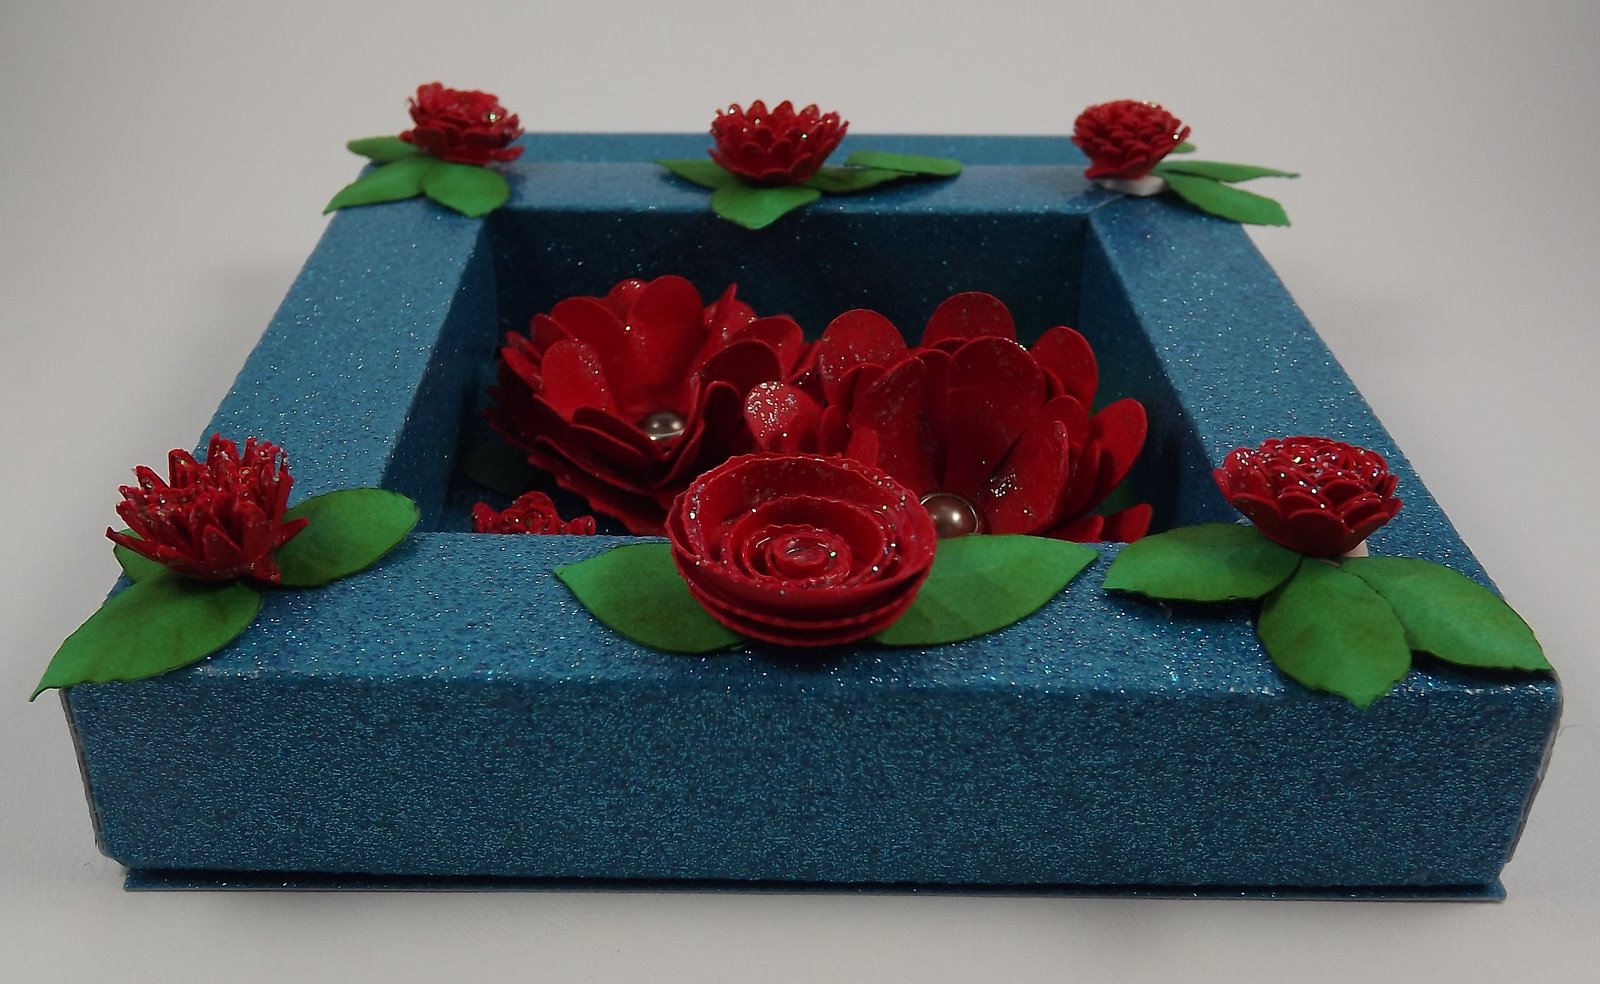
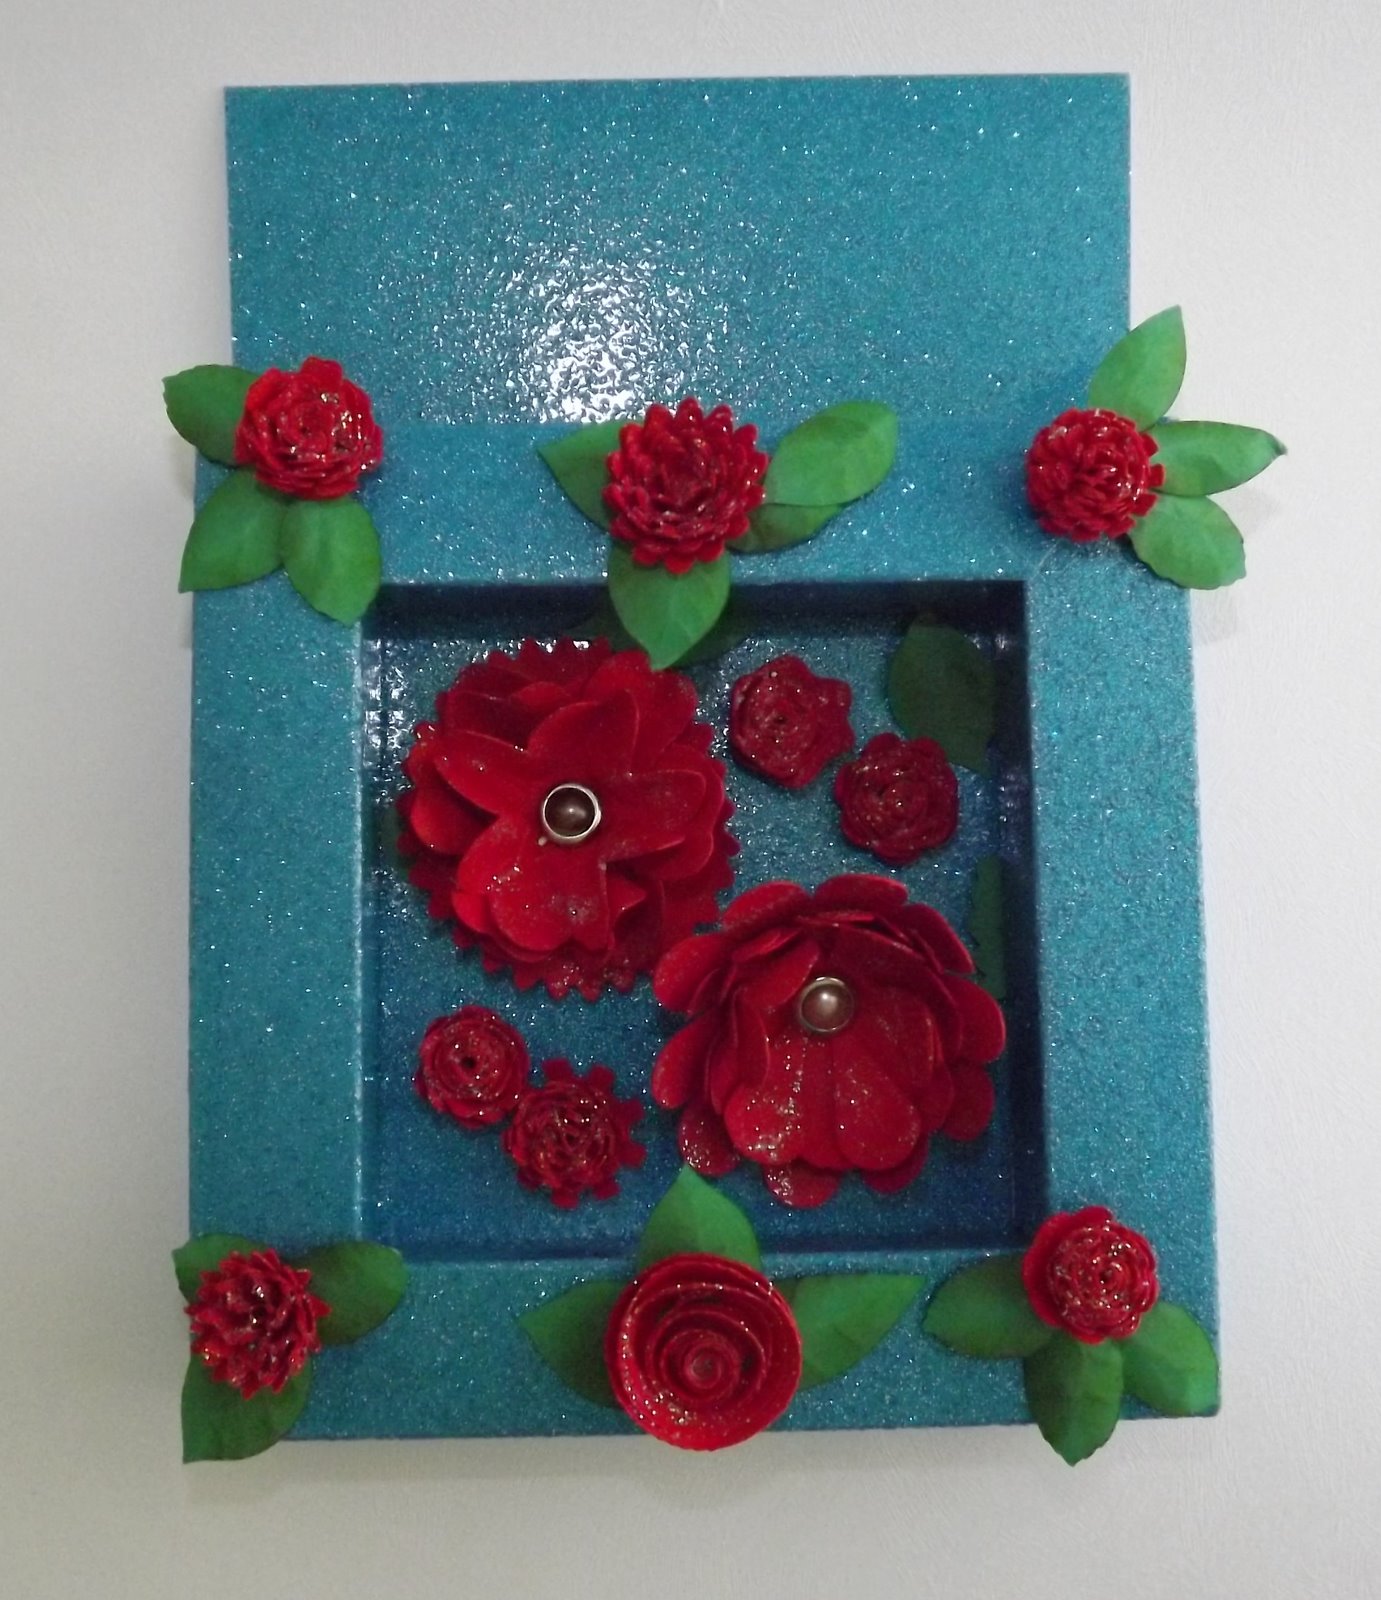
My sister has inspired me to do even more with my cricut and I haven't been feeling the best so my crafting mojo is suffering. Well I got out the Flower Shoppe cartridge well I accessed it on my gypsy (everything is on Gypsy2 lets face it except for the inbuilt carts on the E2) anyway I digress- the flowers have many different ways of putting them together and I will do a vodeo of them eventually so I can have it on file, but in the meantime there are the little flowers that cut out like a decreasing circle and you roll them up like quilling. they were cut at 2 inches and their finished size is about 1/2 inch. The bigger ones were the flowers down the botton of the overlay and I used a scoring tool to break the fibre of the paper on a circular motion which them makes the flower parts curl upwards. there are holes in them so I just added a brad. Now the outside box well that is a treat I found out how to do this at my upline in StampinUp. She is an absolute wizz and making new things up and how to do this 3d frame was her invention so until I have her permission to sy how it is done I will loeave you in suspense unless you come to a StampinUp workshop.

glitter - http://www.sparklee.com


Posted by Picasa

How to make a Light Box

I have been investigating light boxes and how to make your own, and although I usually have boxes all over the place my DH decided to do a clean out and threw them all away. Well now to wait for a box that I could do something with. NOW a light went off or maybe on when I saw some plastic storage boxes, the large ones 55 litre that have lids and are on wheels that I store all my stuff in that I don't need for a while (or longer) and I did have 2 lights that are so old they are from the ark but they work! and so I got the lights out they are on little stands that bend and put them either side of the plastic white box put a sheet of white paper in the back of the box and along the bottom and voila I have a light box. It's not perfect yet as it does need some modification with where the lights are but it does make a difference to the colours.   Certainly still much better than without the box. Check out the colour of the background both these pick taken at the same time same camera one that has the yellow orange background didnt have the lights on. An amazing difference for colour.


glitter - http://www.sparklee.com

Monday, January 16, 2012

Inspiration


Now I have been trying to use papers from my stash and I made a card from the lilac paper but I was not happy with it as paper. I felt it needed to be card so I cut the cardstock from SU Rich Razzleberry and then layered the card I had done onto it with a little tweaking. I stamped the image from the SU Because I care Hostess set from the 2010 catalogue. I stampe it in versamark and used heat and stick and added the SU liliac glitter. Then I added the stem and the leaves and used a versamark pen to add more heat and stick and added certainly celery glitter to part of the leaves. The frame is from a cricut cartridge Fancy Frames and the punch I have used on the inside and on the front is the SU Border scallop trim and the corner punch that matches. The butterfly is a Fiskers punch. The sentiment on the front comes from a mini cuttlebug embossing folder that after I embossed I put through the cricut to cut it out as I didn't have a punch big enough. On the inside I saw this sentiment on a picture of a church noticeboard and this sentiment appealed to me. I would like to think I aspire to inspire. You may like to do the same. It is often the small things that make the difference. A thoughtful word a hug or just letting someone know you care. Say thankyou to someone who has done something for someone else to show you noticed. Appreciate your family and friends, let them know you care.

glitter - http://www.sparklee.com

Posted by Picasa

Sunday, January 15, 2012

Card making on a budget


My blog is for the things I do so I can look back over them. But I received this card from my sister, she has a lot of talent but not a lot of money at the moment and so I gave her a baby bug to play with. As she is in that dreaded learning phase and not wanting to ruin good papers and cardstock she used magazines to cut and form this card she sent to me. She has done stamping and cricut cuts and has added sparklie paper and part of a doily.
I see many people who think they can not make cards as they don't have the money to get the 'fancy papers' but this just shows the love, time and effort that has gone into this card makes it a very special gift. Receiving this card makes me realise that I am a very lucky person. Sis I love you heaps you always make me feel better when I am down and make me realise how grateful I am to have a sis like you.

glitter - http://www.sparklee.com

Posted by Picasa

Tuesday, January 10, 2012


I love the milk carton die from StampinUp as it fits one or two small chocy bars in the box. Here I have used some A4 coloured paper I had in my stash and cut it in half so each sheet made 2 milk cartons. Then I decided to make a carrier for them. The spotted box is a 6x6 pack of stampinUp paper and worked out really well and the other box is a pearlescent 6x6 pack I picked up some time ago when I was cruisin around the Warehouse. The little owl is from the Owl punch from StampinUp using the heart shape as his beak and playing round with different papers for his eyes. the leaves are from the bird punch. The bird punch is one I use a lot for all the bits on it as I do the owl punch. These punches are very versatile. I made these to cheer up my work colleagues.


glitter - http://www.sparklee.com

Monday, January 9, 2012

Milk cartons in a box


Wee milk cartons from the SU milk carton die in little box covered with butterflys.

glitter - http://www.sparklee.com


Posted by Picasa

Thursday, January 5, 2012

Kanga comes to visit


I love the Pooh bear characters and Kanga (at 4inches)got made today as a friend wanted a kangaroo so I thought I would make kanga to see if this is what she wants. The tree (cut at 11.5inches on a 24x12 mat) is Pooh's house with all the layers and the top of the tree is stamped with the tree stamp from Lovely as a tree from StampinUpthe grass cuts are on many cartridges and I have inked the edges with SU old olive ink.

glitter - http://www.sparklee.com

Posted by Picasa

Sunday, January 1, 2012

Froglets


These are thefrogs from the Cricut Create a Critter cartridge. I did not cut the layer 1 but just the main layer for the body so it didn't cut out the eyes and mouth so instead of wasting it I just used my faithful StampinUp owl punch and punched out eyes and hearts to use instead. The mouth are drawn on currently might put little tongues on yet.

glitter - http://www.sparklee.com

Posted by Picasa