Thursday, August 23, 2012

Flip flop box


I came across a flip flop box and thought it was a cute little box. It is actually quite a big box for putting something in. I made it from an svg file and this is it plain no decorations. Its 5 5/8th inches long so would hold quite a bit of whatever you wanted to put inside.
glitter - http://www.sparklee.com

Monday, August 20, 2012

Little Yellow bird


The bird and branch from spring cottage is lovely but when I got a call to say Madge from Madge’s Creations found it difficult to cut the layer even at 4 inches I was intrigued and decided to give it a go. I was on a blog recently where someone had redone a card because they didn’t like the way it turned out and had commented that there was a decoration on the icon that they had cut in vinyl as it was so intricate. When I cut the layer to the bird at 3 inches I could see what was meant as the tail feathers are less than a millimetre in width. I found when using the Cricut cake machine if the line to be cut was narrower than the depth of the icing then it would not cut well. I also found that this applied to some extent with paper cuts as well on the Cricut’s hence if you are doing something very thin and intricate then by kiss cutting vinyl you will get a better cut. Now having some vinyl in my stash I decided to do just this and you can see that the yellow bird has a blue vinyl layer and if you look very closely you will see that the area between the tail feathers is about the width of a thin pencil line. Now the yellow bird with the brown head I cut the layer in brown cardstock. The layer cut s as 2 separate pieces so as the brown head cut fine I put this on to take the photo. Now having discovered that the vinyl cut well for the layer I decided to use a thin cardstock paper I have in my stash called “scrapbook Paper” by Grant Archival called Photguard which is a firm paper not a cardstock. This paper I layered on my mat and cut the layer with settings of speed 3, pressure 3, cut 1 and blade depth of 3 and it did cut the layer (as I held my breath) Setting on the Cricut or any of your die cutting machines are very important and so is size to get the best cut. Now if you want to do this bird at a 2inches then I would suggest you do it in vinyl. Another thing to remember is the way the Cricut sizes objects. When you put the icon  on your mat it could be sized at 3 inches but does this mean the bird is 3 inches long or 3 inches high. In the case of the bird it is 3 inches long not 3 inches high. If you do not have an e2, Gypsy or Imagine then you can download Cricut design studio free trial or go onto cricut.com and check out Cricut craft room and when you place your icon on the mat you can see how big it will turn out. Also Cricut Craft room is free so if you have the cartridge you can design on Cricut Craft Room and cut where you want to on your mat by hooking up your computer to the Cricut. The Cricut attaches to a usb port with a cable like a printer cable.
Now about the branch- I cut the branch at a height of 2 inches and this gave me a length of just over 3.5 inches as opposed to the bird at 3 inches which cut lengthwise 3 inches but the height was 1.75 inches. Now I know this can be very confusing but I do suggest you play a bit with Cricut Craft Room and see what it does for you after all it is a free program. Now with the branch I cut the flowers out and just glued them to the branch haphazardly and some of the smaller ones I layered onto the others which give the flowers some depth. Inking the edges of the flowers would give them more definition again, but I was just playing with these to try them.


glitter - http://www.sparklee.com

Sunday, August 19, 2012

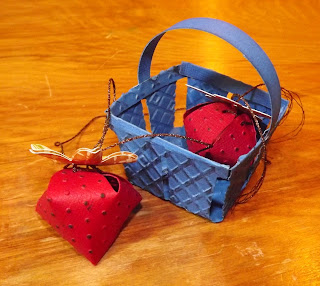
Strawberry baskets


These are strawberry baskets from the Spring Cottage  cartridge. They cut out to measure 2x2x1.25 inches from putting them on the mat at 5.5 inches. The strawberries were cut at 2.98inches, 2.8 in and 2.6 inches to get as many on the mat as I could.. I have just tied the top leaf with Sew Easy fancy floss. The baskets I embossed with a sizzix folder and the strawberries with the small dots folder then I used a ink pad to colour the dots on the strawberries black and inked the basket with SU night of navy ink.


glitter - http://www.sparklee.com

Saturday, August 18, 2012

Mama cat take the hint

About 3-4 weeks ago a small dark tortishell cat decided to come into my home, in she waltzed through the cat door and helped herself to a feed and sat down and cleaned herself. I thought at first she was my cat as I have a very fat dark torti cat I inherited from someone who could no longer have her and she is almost the same colour except that Beauty is a very fat cat who looks like "cheshire cat". Well as the little cat appeared to come from nowhere and had already visited my daughter next door and none of the neighbours owned her and se had picked my place to come to I decided one more cat wasn't going to make much difference I only had 2. Well as she seemed to have a problem scratching I decided to take her to the vet and well yes there will be a few more pussy cats soon. She has obviously been dumped as we live in a rural area some 350 metres off the road. Well after finding out she is not a baby like I thought but probably 5 years old and she is soo cute and fluffy well how special to be chosen to be the home of such a cute wee thing. Well now te vet said she would have 4-5 kittens in about 2 weeks but her 2 weeks is up and she doesn't look like she is ready yet so after making her a special box I covered it in very bright paper. Not sure its not too bright but she is still habiting the box a lot of the time. Well I thought I might give her a hint so I made some cats from the Cricut Meow cartridge. you have to look quite close as it is very busy paper but they did turn out cute.The clock is just to let her know 'its time!'


glitter - http://www.sparklee.com

Monday, August 13, 2012

the Lion cage


 I was looking at doing a bird cage but then the thought popped into my head to do a circus theme to match the fair ground circus theme, I have done the ferris wheel. Now I'm not sure that actually goes together but I do have a haunted house that will be added to this lot as well. Well my bird cage got fatter and shorter and I just couldn't get the thought of lions inside it out of my head so I decided to make it into a lion cage. I used the star from the centre of the ferris wheel and made the 'fire' in the centre of red glitter paper punched leaves from the SU bird punch. The lions are from zoo animals and stand up because I have added a circle to the bottom of their feet. The top of the cage wasn't quite right but that was because I forgot to change the angle to glue it on but as with all metalwork I just gave it a squeeze and a poke and made it go up and down and quite like my delapated lion cage. The bottom liner has stars embossed on it and is pearlised in gold giving the bottom a sandy look.


glitter - http://www.sparklee.com

Baby carriage from Bundle of Joy

I loved the baby carriage from bundle of joy svgcuts.com and one of the things I have at home is a mold of a sleeping baby that you can make with icing. I did this some time ago and have had them packed in plastic boxes and today decided one needed to take a ride in the baby carriage.
glitter - http://www.sparklee.com

Baby shoes

These baby shoes are very cute and I have been doing a lot of baby things as I am expecting a new DGD very soon. The upper ones are cut from the Bundle of joy project on svgcuts.com and the lower ones from the CTMH Cricut Artiste cartridge. They are a bit tricky to put together as I did cut them quite small. the upper ones come with a liner to cover the bottom but on the lower ones I there was no liner so I added one but forgot to add 2 (maybe I have foot in mouth LOL) but it would be quite easy to cut a liner a little smaller to cover the tabs that you can see in the picture. In the bottom ones they also have small holes to thread ribbon through I just havent done this as yet as these were practice ones. Gota love practice ones. I also realised after I had cut them there is a little strap for the bottom ones. Maybe I need to read the book before I cut them again. Makes for more practice.

glitter - http://www.sparklee.com

CDoF Lantern

This is another lantern from svgcuts.com it has a small apeture in the back so it is easy to put in a battery tea light and the ones I use are colour changing so they look quite pretty. it has holes to put in a handle and I made this handle from paper clips. It is only about 6 inches high but is quite cute. This lantern is from their "Crisp days of Fall" project.


glitter - http://www.sparklee.com

Monday, August 6, 2012

Finished Ferris wheel

This is a paper Ferris wheel and I have now finished decorating it. Used the svgcuts.com files as well as cricut cartridges.
The files from svgcuts.com were Street Carnival, Bundle of Joy and Fairies cut on the eclips. The cartridges from Cricut  were CTMH Art philosophy and Artiste and Create a critter.


glitter - http://www.sparklee.com

Saturday, August 4, 2012

Ferris wheel made from paper

 
Here is the start of the ferris wheel I am making . have yet to finish but will add some more pics when I have it embellished. It is cut from Street Carnival from svgcuts.com.
glitter - http://www.sparklee.com